Configure Points of Interest (POIs)
Points of Interest (POIs), also referred to as Geo-Fencing, are geographical locations on the map that are of importance to your organization to monitor when your Assets arrive and depart from these locations. Using POIs you can set up email notifications and rules to keep you informed about your assets or Resources’ interactions with them. Examples of POIs include: Customer Locations, Employee Residences, and Border Crossings.
HOW TO ADD A POI TYPE
A Point of Interest Type is used to organize each of your Points of Interest into a group. These groups are useful when you are filtering information, creating rules, and for reporting purposes.
Steps:
-
From the Tracking screen, click the Menu Bar icon on the top left-hand corner to access the Navigation Panel
-
Click the Manage menu item
-
Click the POIs submenu item
-
Select POI Types
-
Click the Add button
-
In the Description field, type the description of the POI Type. For example “Customer Locations”
Note: POIs can be drawn using either a circle, shape, or line on the map.
-
From the Map Icon dropdown list, select the icon you that you want to use to visually represent this POI Type via the Tracking screen
-
From the Line Thickness dropdown list, select the appropriate number. Numbers 1 to 4 is best for narrow residential streets and pathways, while numbers 5 to 9 are better for wide roads and multi-lane highways
-
Click the blue circle to select a Line Fill Color
-
Click the Save button

HOW TO ADD A POI
Steps:
-
From the Tracking screen, click the Menu Bar icon on the top left-hand corner to access the Navigation Panel
-
Click the Manage menu item
-
Click the POIs submenu item
-
Select POIs
-
Click the Add button
General Tab
-
On the Add POI screen, on the General tab, type the Description of the POI
-
Search for the Address with the following fields:
-
Address
-
Address 2
-
City
-
Province/ State
-
State
-
County / Region
-
Country
-
Postal / Zip Code
-
-
From the POI Category dropdown list, select a Category description
-
From the POI Type dropdown list, select a POI Type description
-
Optionally, in the Notes text box, type a brief Note about the Point of Interest
Using the Map Area, you can draw your POI in one of three ways:
-
Circle
-
Shape, or
-
Line
Circle POI
-
At the bottom of the Map Area, click the Draw Circle button
-
Click the Map Area where you would like to create your POI
-
Move the mouse outwards to increase the radius of the circle. Alternatively, move the mouse inwards to decrease the radius of the circle
-
To lock the POI in place, left-click the Map Area with your mouse
-
To move the POI around the map, left-click the White Anchor at the centre of the POI and drag it to a new location on the Map Area
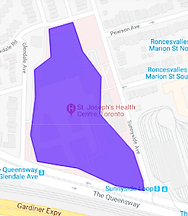
Shape POI
This button is used to draw a more specific shape for the POI location. For example, a Building, Parking lot, or Residence.
-
At the bottom of the Map Area, click the Draw a Shape button
-
Click the Map Area where you would like to create your POI
-
Add more anchors by left-clicking and dragging your mouse around the POI location
-
Double click your mouse when you have almost completed drawing the POI shape, the system will automatically connect the first and last anchors together
Line POI
Lastly, you have the Line button which can be used to draw POIs along roads and/or highways. You can create a Line POI the same way as the Shape POI by left-clicking and dragging your mouse and double-clicking when done.
-
At the bottom of the Map Area, click the Draw a Line button
-
Click the Map Area where you would like to create your POI
-
Add more anchors by left-clicking and dragging your mouse around the POI location
-
Double-click your mouse when you have completed drawing your line
Contact Tab
The Contact tab allows you to record contact details for anyone needing notifications when an asset or resource arrives and departs from this location.
-
On the new POI screen, click the Contact Tab
-
Type in:
-
Name
-
Title
-
Phone Number
-
Mobile Number
-
Fax
-
And Email Address
Notifications Tab
The Notification tab allows you to send email notifications of Arrivals and Departures at this POI for which you defined the contact details on the previous tab.The Arrival and Departure notification subject lines and message bodies are customizable.
-
On the new POI screen, click the Notification Tab
-
Activate the Email Update feature by sliding the radial button to the right
-
Define the appropriate Subject line and Body of the email notification
-
You can also set a delay for when notifications are sent out. The default will be set to a minimum of 3 minutes.
-
Click the Save button